On this page
Set up your environment
Deno comes with many of the tools that are commonly needed for developing applications, including a full language server (LSP) to help power your IDE of choice. This page will help you set up your environment to get the most out of Deno while you are developing.
We'll cover:
- How to use Deno with your favorite editor/IDE
- How to use Deno with AI coding assistants
- How to generate shell completions
Setting up your editor/IDE Jump to heading
Visual Studio Code Jump to heading
If you haven’t already, download and install Visual Studio Code from the official website.
In the Extensions tab, search for "Deno" and install the extension by Denoland.
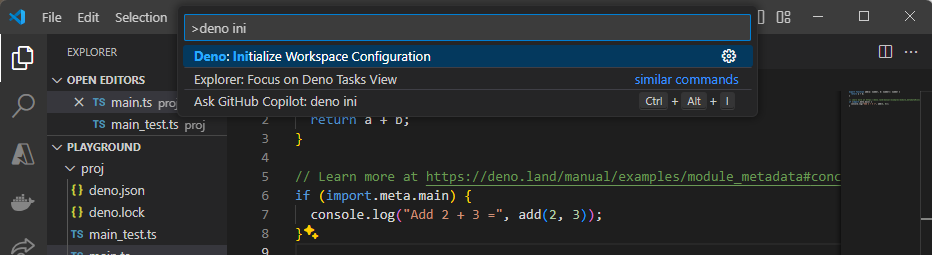
Next, open the Command Palette by pressing Ctrl+Shift+P and type
Deno: Initialize Workspace Configuration. Select this option to configure Deno
for your workspace.
A file called .vscode/settings.json will be created in your workspace with the
following configuration:
{
  "deno.enable": true
}
That’s it! You’ve successfully set up your developer environment for Deno using VSCode. You will now get all the benefits of Deno’s LSP, including IntelliSense, code formatting, linting, and more.
Skills for AI assistants Jump to heading
Deno provides official skills — specialized knowledge packs that give AI coding assistants (such as Claude, GitHub Copilot, Cursor, and others) accurate, up-to-date knowledge of Deno's APIs, conventions, and best practices.
Without these skills, AI assistants may suggest Node.js-specific patterns or
outdated Deno APIs. Loading the relevant skill ensures the assistant understands
Deno's module system, standard library, deno.json configuration, Deno Deploy,
Fresh, and more.
Skills are available at
github.com/denoland/skills. Each skill is
a plain text or markdown file you can paste into your AI assistant's context,
add to a project-level instructions file (e.g. CLAUDE.md,
.github/copilot-instructions.md), or configure as a persistent system prompt —
depending on your tool.
Available skills include:
- deno-guidance — foundational Deno knowledge: module imports,
deno.json, CLI commands, and package selection - deno-deploy — deploying to Deno Deploy, KV, environment variables, and the
deno deployCLI - deno-frontend — building web UIs with the Fresh framework and Preact
- deno-expert — advanced Deno patterns for code review and debugging
- deno-sandbox — executing untrusted code safely with
@deno/sandbox
JetBrains IDEs Jump to heading
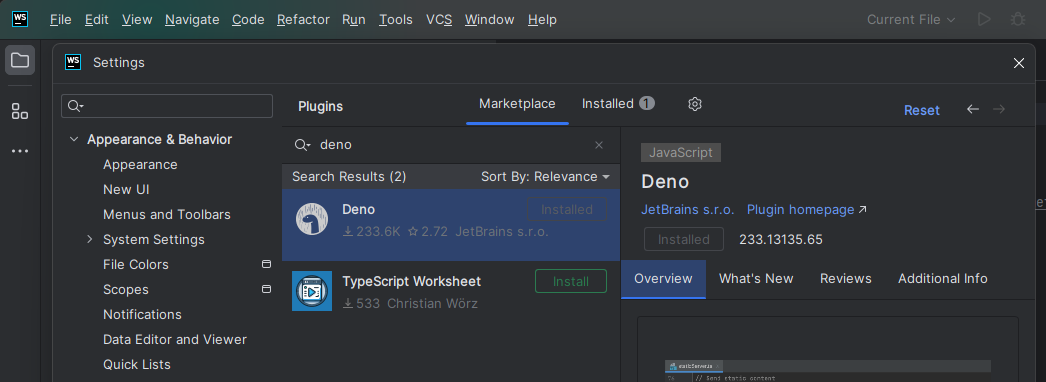
To install the Deno Plugin, open your IDE and go to File > Settings.
Navigate to Plugins and search for Deno. Install the official Deno plugin.
To configure the Plugin, go to File > Settings again. Navigate to Languages & Frameworks > JavaScript Runtime. Switch Preferred Runtime to Deno. Under Deno, specify the path to the Deno executable (if it has not been auto-detected).
Check out this blog post to learn more about how to get started with Deno in Jetbrains IDEs.
Vim/Neovim via plugins Jump to heading
Deno is well-supported on both Vim and Neovim via coc.nvim, vim-easycomplete, ALE and vim-lsp. coc.nvim offers plugins to integrate to the Deno language server while ALE supports it out of the box.
Neovim 0.6+ using the built-in language server Jump to heading
To use the Deno language server install nvim-lspconfig and follow the instructions to enable the supplied Deno configuration.
Note that if you also have ts_ls as an LSP client, you may run into issues
where both ts_ls and denols are attached to your current buffer. To resolve
this, make sure to set some unique root_dir for both ts_ls and denols. You
may also need to set single_file_support to false for ts_ls to prevent it
from running in single file mode. Here is an example of such a configuration:
vim.lsp.config('denols', {
    on_attach = on_attach,
    root_markers = {"deno.json", "deno.jsonc"},
})

vim.lsp.config('ts_ls', {
    on_attach = on_attach,
    root_markers = {"package.json"},
    single_file_support = false,
})
For Deno, the example above assumes a deno.json or deno.jsonc file exists at
the root of the project.
Kickstart.nvim and Mason LSP Jump to heading
If you are using kickstart.nvim
add the above configuration like this inside the servers table in your
configuration init.lua.
local servers = {
        -- ... some configuration
        ts_ls = {
            root_dir = require("lspconfig").util.root_pattern({ "package.json", "tsconfig.json" }),
            single_file_support = false,
            settings = {},
        },
        denols = {
            root_dir = require("lspconfig").util.root_pattern({"deno.json", "deno.jsonc"}),
            single_file_support = false,
            settings = {},
        },
    }
coc.nvim Jump to heading
Once you have
coc.nvim
installed, you need to install the required
coc-deno via :CocInstall coc-deno.
Once the plugin is installed, and you want to enable Deno for a workspace, run
the command :CocCommand deno.initializeWorkspace and you should be able to
utilize commands like gd (goto definition) and gr (go/find references).
ALE Jump to heading
ALE supports Deno via the Deno language server out of the box and in many uses
cases doesn't require additional configuration. Once you have
ALE installed you can
perform the command
:help ale-typescript-deno
to get information on the configuration options available.
For more information on how to setup ALE (like key bindings) refer to the official documentation.
Vim-EasyComplete Jump to heading
Vim-EasyComplete supports Deno without any other configuration. Once you have
vim-easycomplete installed,
you need install deno via :InstallLspServer deno if you haven't installed
deno. You can get more information from
official documentation.
Vim-Lsp Jump to heading
After installing Vim-Lsp through
vim-plug
or vim packages. Add this code to your .vimrc configuration:
if executable('deno')
  let server_config = {
    \ 'name': 'deno',
    \ 'cmd': {server_info->['deno', 'lsp']},
    \ 'allowlist': ['typescript', 'javascript', 'javascriptreact', 'typescriptreact'],
    \ }

  if exists('$DENO_ENABLE')
    let deno_enabled = $DENO_ENABLE == '1'
    let server_config['workspace_config'] = { 'deno': { 'enable': deno_enabled ? v:true : v:false } }
  endif

  au User lsp_setup call lsp#register_server(server_config)
endif
You will have two ways to enable the LSP Server. One is to have a deno.json or
deno.jsonc in your current working directory, or force it with
DENO_ENABLE=1. Also if you want to highlight syntax in the intellisense
tooltip, you can add this code to your .vimrc configuration too:
let g:markdown_fenced_languages = ["ts=typescript"]
Emacs Jump to heading
lsp-mode Jump to heading
Emacs supports Deno via the Deno language server using lsp-mode. Once lsp-mode is installed it should support Deno, which can be configured to support various settings.
eglot Jump to heading
You can also use built-in Deno language server by using
eglot.
An example configuration for Deno via eglot:
(add-to-list 'eglot-server-programs '((js-mode typescript-mode) . (eglot-deno "deno" "lsp")))

  (defclass eglot-deno (eglot-lsp-server) ()
    :documentation "A custom class for deno lsp.")

  (cl-defmethod eglot-initialization-options ((server eglot-deno))
    "Passes through required deno initialization options"
    (list
      :enable t
      :unstable t
      :typescript
        (:inlayHints
          (:variableTypes
            (:enabled t))
          (:parameterTypes
            (:enabled t)))))
This is the equivalent of having the following settings in a VSCode
settings.json:
{
  "deno.enable": true,
  "deno.unstable": true,
  "typescript.inlayHints.variableTypes.enabled": true,
  "typescript.inlayHints.parameterTypes.enabled": true
}
Pulsar Jump to heading
The Pulsar editor, formerly known as Atom supports
integrating with the Deno language server via the
atom-ide-deno package.
atom-ide-deno requires that the Deno CLI be installed and the
atom-ide-base package to
be installed as well.
Sublime Text Jump to heading
Sublime Text supports connecting to the Deno language server via the LSP package. You may also want to install the TypeScript package to get full syntax highlighting.
Once you have the LSP package installed, you will want to add configuration to
your .sublime-project configuration like the below:
{
  "settings": {
    "LSP": {
      "deno": {
        "command": ["deno", "lsp"],
        "initializationOptions": {
          // "config": "", // Sets the path for the config file in your project
          "enable": true,
          // "importMap": "", // Sets the path for the import-map in your project
          "lint": true,
          "unstable": false
        },
        "enabled": true,
        "languages": [
          {
            "languageId": "javascript",
            "scopes": ["source.js"],
            "syntaxes": [
              "Packages/Babel/JavaScript (Babel).sublime-syntax",
              "Packages/JavaScript/JavaScript.sublime-syntax"
            ]
          },
          {
            "languageId": "javascriptreact",
            "scopes": ["source.jsx"],
            "syntaxes": [
              "Packages/Babel/JavaScript (Babel).sublime-syntax",
              "Packages/JavaScript/JavaScript.sublime-syntax"
            ]
          },
          {
            "languageId": "typescript",
            "scopes": ["source.ts"],
            "syntaxes": [
              "Packages/TypeScript-TmLanguage/TypeScript.tmLanguage",
              "Packages/TypeScript Syntax/TypeScript.tmLanguage"
            ]
          },
          {
            "languageId": "typescriptreact",
            "scopes": ["source.tsx"],
            "syntaxes": [
              "Packages/TypeScript-TmLanguage/TypeScriptReact.tmLanguage",
              "Packages/TypeScript Syntax/TypeScriptReact.tmLanguage"
            ]
          }
        ]
      }
    }
  }
}
Nova Jump to heading
The Nova editor can integrate the Deno language server via the Deno extension.
GitHub Codespaces Jump to heading
GitHub Codespaces allows you to develop fully online or remotely on your local machine without needing to configure or install Deno.
If a project is a Deno enabled project and contains the .devcontainer
configuration as part of the repository, opening the project in GitHub
Codespaces should just "work". If you are starting a new project, or you want to
add Deno support to an existing code space, it can be added by selecting the
Codespaces: Add Development Container Configuration Files... from the command
pallet and then selecting Show All Definitions... and then searching for the
Deno definition.
Once selected, you will need to rebuild your container so that the Deno CLI is added to the container. After the container is rebuilt, the code space will support Deno.
Kakoune Jump to heading
Kakoune supports connecting to the Deno language server
via the kak-lsp client. Once
kak-lsp is installed an
example of configuring it up to connect to the Deno language server is by adding
the following to your kak-lsp.toml:
[language.typescript]
filetypes = ["typescript", "javascript"]
roots = [".git"]
command = "deno"
args = ["lsp"]
[language.typescript.settings.deno]
enable = true
lint = true
Helix Jump to heading
Helix comes with built-in language server support.
Enabling connection to the Deno language server requires changes in the
languages.toml configuration file.
[[language]]
name = "typescript"
roots = ["deno.json", "deno.jsonc", "package.json"]
file-types = ["ts", "tsx"]
auto-format = true
language-servers = ["deno-lsp"]

[[language]]
name = "javascript"
roots = ["deno.json", "deno.jsonc", "package.json"]
file-types = ["js", "jsx"]
auto-format = true
language-servers = ["deno-lsp"]

[language-server.deno-lsp]
command = "deno"
args = ["lsp"]
config.deno.enable = true
Zed Jump to heading
The Zed editor can integrate the Deno language server via the Deno extension.
Shell completions Jump to heading
Built into the Deno CLI is support to generate shell completion information for
the CLI itself. By using deno completions <shell>, the Deno CLI will output to
stdout the completions. Current shells that are supported:
- bash
- elvish
- fish
- powershell
- zsh
bash example Jump to heading
Output the completions and add them to the environment:
> deno completions bash > /usr/local/etc/bash_completion.d/deno.bash
> source /usr/local/etc/bash_completion.d/deno.bash
PowerShell example Jump to heading
Output the completions:
> deno completions powershell >> $profile
> .$profile
This will create a Powershell profile at
$HOME\Documents\WindowsPowerShell\Microsoft.PowerShell_profile.ps1, and it
will be run whenever you launch the PowerShell.
zsh example Jump to heading
You should have a directory where the completions can be saved:
> mkdir ~/.zsh
Then output the completions:
> deno completions zsh > ~/.zsh/_deno
And ensure the completions get loaded in your ~/.zshrc:
fpath=(~/.zsh $fpath)
autoload -Uz compinit
compinit -u
If after reloading your shell and completions are still not loading, you may
need to remove ~/.zcompdump/ to remove previously generated completions and
then compinit to generate them again.
zsh example with ohmyzsh and antigen Jump to heading
ohmyzsh is a configuration framework for zsh and can make it easier to manage your shell configuration. antigen is a plugin manager for zsh.
Create the directory to store the completions and output the completions:
> mkdir ~/.oh-my-zsh/custom/plugins/deno
> deno completions zsh > ~/.oh-my-zsh/custom/plugins/deno/_deno
Then your .zshrc might look something like this:
source /path-to-antigen/antigen.zsh

# Load the oh-my-zsh's library.
antigen use oh-my-zsh

antigen bundle deno
fish example Jump to heading
Output the completions to a deno.fish file into the completions directory in
the fish config folder:
> deno completions fish > ~/.config/fish/completions/deno.fish
Other tools Jump to heading
If you are writing or supporting a community integration using the Deno language
server, read more about
integrating with the Deno LSP, but also
feel free to join our Discord community in the
#dev-lsp channel.