On this page
- Importing modules
- Import attributes
- WebAssembly modules
- Data URL imports
- Importing third party modules and libraries
- Managing third party modules and libraries
- Differentiating between imports or importMap in deno.json and --import-map option
- Adding dependencies with deno add
- Package Versions
- HTTPS imports
- Overriding dependencies
- Vendoring remote modules
- Publishing modules
- Reloading modules
- Development only dependencies
- Using only cached modules
- Integrity Checking and Lock Files
- Supply chain management
- Private repositories
Modules and dependencies
Deno uses ECMAScript modules as its default module system to align with modern JavaScript standards and to promote a more efficient and consistent development experience. It's the official standard for JavaScript modules, allows for better tree-shaking, improved tooling integration, and native support across different environments.
By adopting ECMAScript modules, Deno ensures compatibility with the ever-evolving JavaScript ecosystem. For developers, this means a streamlined and predictable module system that avoids the complexities associated with legacy module formats like CommonJS.
Importing modules Jump to heading
In this example the add function is imported from a local calc.ts module.
export function add(a: number, b: number): number {
  return a + b;
}
// imports the `calc.ts` module next to this file
import { add } from "./calc.ts";

console.log(add(1, 2)); // 3
You can run this example by calling deno run main.ts in the directory that
contains both main.ts and calc.ts.
With ECMAScript modules, local import specifiers must always include the full file extension. It cannot be omitted.
// WRONG: missing file extension
import { add } from "./calc";

// CORRECT: includes file extension
import { add } from "./calc.ts";
Import attributes Jump to heading
Deno supports the with { type: "json" } import attribute syntax for importing
JSON files:
import data from "./data.json" with { type: "json" };

console.log(data.property); // Access JSON data as an object
Starting with Deno 2.4 it's possible to import text and bytes modules too.
Support for importing text and bytes modules is experimental and requires
--unstable-raw-imports CLI flag or unstable.raw-import option in
deno.json.
import text from "./log.txt" with { type: "text" };

console.log(typeof text === "string");
// true
console.log(text);
// Hello from a text file
import bytes from "./image.png" with { type: "bytes" };

console.log(bytes instanceof Uint8Array);
// true
console.log(bytes);
Uint8Array(12) [
//    72, 101, 108, 108, 111,
//    44,  32,  68, 101, 110,
//   111,  33
// ]
WebAssembly modules Jump to heading
Deno supports importing Wasm modules directly:
import { add } from "./add.wasm";

console.log(add(1, 2));
To learn more, visit WebAssembly section
Data URL imports Jump to heading
Deno supports importing of data URLs, which allows you to import content that isn't in a separate file. This is useful for testing, prototyping, or when you need to programmatically generate modules.
You can create modules on the fly using the data: URL scheme:
// Import a simple JavaScript module from a data URL
import * as module from "data:application/javascript;base64,ZXhwb3J0IGNvbnN0IG1lc3NhZ2UgPSAiSGVsbG8gZnJvbSBkYXRhIFVSTCI7";
console.log(module.message); // Outputs: Hello from data URL

// You can also use the non-base64 format
const plainModule = await import(
  "data:application/javascript,export function greet() { return 'Hi there!'; }"
);
console.log(plainModule.greet()); // Outputs: Hi there!

// A simpler example with text content
const textModule = await import(
  "data:text/plain,export default 'This is plain text'"
);
console.log(textModule.default); // Outputs: This is plain text
The data URL format follows this pattern:
data:[<media type>][;base64],<data>
For JavaScript modules, use application/javascript as the media type.
TypeScript is also supported with application/typescript. This feature is
particularly useful for testing modules in isolation and creating mock modules
during tests.
Importing third party modules and libraries Jump to heading
When working with third-party modules in Deno, use the same import syntax as
you do for local code. Third party modules are typically imported from a remote
registry and start with jsr: , npm: or https://.
import { camelCase } from "jsr:@luca/cases@1.0.0";
import { say } from "npm:cowsay@1.6.0";
import { pascalCase } from "https://deno.land/x/case/mod.ts";
Deno recommends JSR, the modern JavaScript registry, for third party modules. There, you'll find plenty of well documented ES modules for your projects, including the Deno Standard Library.
You can read more about Deno's support for npm packages here.
Managing third party modules and libraries Jump to heading
Typing out the module name with the full version specifier can become tedious
when importing them in multiple files. You can centralize management of remote
modules with an imports field in your deno.json file. We call this imports
field the import map, which is based on the Import Maps Standard.
{
  "imports": {
    "@luca/cases": "jsr:@luca/cases@^1.0.0",
    "cowsay": "npm:cowsay@^1.6.0",
    "cases": "https://deno.land/x/case/mod.ts"
  }
}
With remapped specifiers, the code looks cleaner:
import { camelCase } from "@luca/cases";
import { say } from "cowsay";
import { pascalCase } from "cases";
The remapped name can be any valid specifier. It's a very powerful feature in Deno that can remap anything. Learn more in the configuration dependencies section.
Differentiating between imports or importMap in deno.json and --import-map option Jump to heading
The Import Maps Standard requires two entries for each module: one for the
module specifier and another for the specifier with a trailing /. This is
because the standard allows only one entry per module specifier, and the
trailing / indicates that the specifier refers to a directory. For example,
when using the --import-map import_map.json option, the import_map.json file
must include both entries for each module (note the use of jsr:/@std/async
instead of jsr:@std/async):
{
  "imports": {
    "@std/async": "jsr:@std/async@^1.0.0",
    "@std/async/": "jsr:/@std/async@^1.0.0/"
  }
}
An import_map.json file referenced by the importMap field in deno.json
behaves exactly the same as using the --import-map option, with the same
requirements for including both entries for each module as shown above.
In contrast, deno.json extends the import maps standard. When you use the
imports field in deno.json, you only need to specify the module specifier
without the trailing /:
{
  "imports": {
    "@std/async": "jsr:@std/async@^1.0.0"
  }
}
Adding dependencies with deno add Jump to heading
The installation process is made easy with the deno add subcommand. It will
automatically add the latest version of the package you requested to the
imports section in deno.json.
# Add the latest version of the module to deno.json
$ deno add jsr:@luca/cases
Add @luca/cases - jsr:@luca/cases@1.0.0
{
  "imports": {
    "@luca/cases": "jsr:@luca/cases@^1.0.0"
  }
}
You can also specify an exact version:
# Passing an exact version
$ deno add jsr:@luca/cases@1.0.0
Add @luca/cases - jsr:@luca/cases@1.0.0
Read more in deno add reference.
You can also remove dependencies using deno remove:
$ deno remove @luca/cases
Remove @luca/cases
{
  "imports": {}
}
Read more in deno remove reference.
Package Versions Jump to heading
It is possible to specify a version range for the package you are importing.
This is done using the @ symbol followed by a version range specifier, and
follows the semver versioning scheme.
For example:
@scopename/mypackage           # highest version
@scopename/mypackage@16.1.0    # exact version
@scopename/mypackage@16        # highest 16.x version >= 16.0.0
@scopename/mypackage@^16.1.0   # highest 16.x version >= 16.1.0
@scopename/mypackage@~16.1.0   # highest 16.1.x version >= 16.1.0
Here is an overview of all the ways you can specify a version or a range:
| Symbol | Description | Example |
|---|---|---|
1.2.3 |
An exact version. Only this specific version will be used. | 1.2.3 |
^1.2.3 |
Compatible with version 1.2.3. Allows updates that do not change the leftmost non-zero digit. For example, 1.2.4 and 1.3.0 are allowed, but 2.0.0 is not. |
^1.2.3 |
~1.2.3 |
Approximately equivalent to version 1.2.3. Allows updates to the patch version. For example, 1.2.4 is allowed, but 1.3.0 is not. |
~1.2.3 |
>=1.2.3 |
Greater than or equal to version 1.2.3. Any version 1.2.3 or higher is allowed. |
>=1.2.3 |
<=1.2.3 |
Less than or equal to version 1.2.3. Any version 1.2.3 or lower is allowed. |
<=1.2.3 |
>1.2.3 |
Greater than version 1.2.3. Only versions higher than 1.2.3 are allowed. |
>1.2.3 |
<1.2.3 |
Less than version 1.2.3. Only versions lower than 1.2.3 are allowed. |
<1.2.3 |
1.2.x |
Any patch version within the minor version 1.2. For example, 1.2.0, 1.2.1, etc. |
1.2.x |
1.x |
Any minor and patch version within the major version 1. For example, 1.0.0, 1.1.0, 1.2.0, etc. |
1.x |
* |
Any version is allowed. | * |
HTTPS imports Jump to heading
Deno also supports import statements that reference HTTP/HTTPS URLs, either directly:
import { Application } from "https://deno.land/x/oak/mod.ts";
or part of your deno.json import map:
{
  "imports": {
    "oak": "https://deno.land/x/oak/mod.ts"
  }
}
Supporting HTTPS imports enables us to support the following JavaScript CDNs, as they provide URL access to JavaScript modules:
HTTPS imports are useful if you have a small, often single file, Deno project
that doesn't require any other configuration. With HTTPS imports, you can avoid
having a deno.json file at all. It is not advised to use this style of
import in larger applications however, as you may end up with version conflicts
(where different files use different version specifiers). HTTP imports are not
supported by deno add/deno install commands.
Use HTTPS imports with caution, and only from trusted sources. If the server is compromised, it could serve malicious code to your application. They can also cause versioning issues if you import different versions in different files. HTTPS imports remain supported, but we recommend using a package registry for the best experience.
Overriding dependencies Jump to heading
Deno provides mechanisms to override dependencies, enabling developers to use custom or local versions of libraries during development or testing.
Note: If you need to cache and modify dependencies locally for use across builds, consider vendoring remote modules.
Overriding local packages Jump to heading
For developers familiar with npm link in Node.js, Deno provides a similar
feature for local JSR and npm packages through the links field in deno.json.
This allows you to override dependencies with local versions during development
without needing to publish them.
Example:
{
  "links": [
    "../some-package-or-workspace"
  ]
}
Key points:
- The
linksfield accepts paths to directories containing packages or workspaces. If you reference a single package within a workspace, the entire workspace will be included. - Both JSR and npm packages are supported.
- This feature is only respected in the workspace root. Using
linkselsewhere will trigger warnings.
Limitations:
- Git-based dependency overrides are unavailable.
- The
linksfield requires proper configuration in the workspace root.
Overriding NPM packages Jump to heading
Deno supports linking npm packages with local versions, similar to how JSR packages can be linked. This allows you to use a local copy of an npm package during development without publishing it.
To use a local npm package, configure the links field in your deno.json:
{
  "links": [
    "../path/to/local_npm_package"
  ]
}
This feature requires a node_modules directory and has different behaviors
depending on your nodeModulesDir setting:
- With
"nodeModulesDir": "auto": The directory is recreated on each run, which slightly increases startup time but ensures the latest version is always used. - With
"nodeModulesDir": "manual"(default when using package.json): You must rundeno installafter updating the package to get the changes into the workspace'snode_modulesdirectory.
Limitations:
- Specifying a local copy of an npm package or changing its dependencies will purge npm packages from the lockfile, which may cause npm resolution to work differently.
- The npm package name must exist in the registry, even if you're using a local copy.
Overriding HTTPS imports Jump to heading
Deno also allows overriding HTTPS imports through the scopes field in
deno.json. This feature is particularly useful when substituting a remote
dependency with a local patched version for debugging or temporary fixes.
Example:
{
  "imports": {
    "example/": "https://deno.land/x/example/"
  },
  "scopes": {
    "https://deno.land/x/example/": {
      "https://deno.land/x/my-library@1.0.0/mod.ts": "./patched/mod.ts"
    }
  }
}
Key points:
- The
scopesfield in the import map allows you to redirect specific imports to alternative paths. - This is commonly used to override remote dependencies with local files for testing or development purposes.
- Scopes apply only to the root of your project. Nested scopes within dependencies are ignored.
Vendoring remote modules Jump to heading
If your project has external dependencies, you may want to store them locally to avoid downloading them from the internet every time you build your project. This is especially useful when building your project on a CI server or in a Docker container, or patching or otherwise modifying the remote dependencies.
Deno offers this functionality through a setting in your deno.json file:
{
  "vendor": true
}
Add the above snippet to your deno.json file and Deno will cache all
dependencies locally in a vendor directory when the project is run, or you can
optionally run the deno install --entrypoint command to cache the dependencies
immediately:
deno install --entrypoint main.ts
You can then run the application as usual with deno run:
deno run main.ts
After vendoring, you can run main.ts without internet access by using the
--cached-only flag, which forces Deno to use only locally available modules.
For more advanced overrides, such as substituting dependencies during development, see Overriding dependencies.
Publishing modules Jump to heading
Any Deno program that defines an export can be published as a module. This allows other developers to import and use your code in their own projects. Modules can be published to:
- JSR - recommended, supports TypeScript natively and auto-generates documentation for you
- npm - use dnt to create the npm package
- deno.land/x - for HTTPS imports, use JSR instead if possible
Reloading modules Jump to heading
By default, Deno uses a global cache directory (DENO_DIR) for downloaded
dependencies. This cache is shared across all projects.
You can force deno to refetch and recompile modules into the cache using the
--reload flag.
# Reload everything
deno run --reload my_module.ts

# Reload a specific module
deno run --reload=jsr:@std/fs my_module.ts
Development only dependencies Jump to heading
Sometimes dependencies are only needed during development, for example dependencies of test files or build tools. In Deno, the runtime does not require you to distinguish between development and production dependencies, as the runtime will only load and install dependencies that are actually used in the code that is being executed.
However, it can be useful to mark dev dependencies to aid people who are reading
your package. When using deno.json, the convention is to add a // dev
comment after any "dev only" dependency:
{
  "imports": {
    "@std/fs": "jsr:@std/fs@1",
    "@std/testing": "jsr:@std/testing@1" // dev
  }
}
When using a package.json file, dev dependencies can be added to the separate
devDependencies field:
{
  "dependencies": {
    "pg": "npm:pg@^8.0.0"
  },
  "devDependencies": {
    "prettier": "^3"
  }
}
JSR packages in package.json Jump to heading
You can depend on JSR packages directly from package.json using the jsr:
scheme, without needing a separate deno.json:
{
  "dependencies": {
    "@std/path": "jsr:^1.0.9"
  }
}
This works with deno install and brings JSR packages to any project that uses
package.json for dependency management.
Dependency overrides Jump to heading
The overrides field in package.json lets you control transitive dependency
versions throughout your dependency tree. This is useful for applying security
patches, fixing version compatibility issues, or replacing packages:
{
  "dependencies": {
    "express": "^4.18.0"
  },
  "overrides": {
    "cookie": "0.7.0",
    "express": {
      "qs": "6.13.0"
    }
  }
}
In this example, cookie is pinned globally to 0.7.0, while qs is
overridden only when required by express.
Why does Deno not have a devImports field? Jump to heading
To understand why Deno does not separate out dev dependencies in the package manifest it is important to understand what problem dev dependencies are trying to solve.
When deploying an application you frequently want to install only the dependencies that are actually used in the code that is being executed. This helps speed up startup time and reduce the size of the deployed application.
Historically, this has been done by separating out dev dependencies into a
devDependencies field in the package.json. When deploying an application,
the devDependencies are not installed, and only the dependencies.
This approach has shown to be problematic in practice. It is easy to forget to
move a dependency from dependencies to devDependencies when a dependency
moves from being a runtime to a dev dependency. Additionally, some packages that
are semantically "development time" dependencies, like (@types/*), are often
defined in dependencies in package.json files, which means they are
installed for production even though they are not needed.
Because of this, Deno uses a different approach for installing production only
dependencies: when running deno install, you can pass a --entrypoint flag
that causes Deno to install only the dependencies that are actually
(transitively) imported by the specified entrypoint file. Because this is
automatic, and works based on the actual code that is being executed, there is
no need to specify development dependencies in a separate field.
Using only cached modules Jump to heading
To force Deno to only use modules that have previously been cached, use the
--cached-only flag:
deno run --cached-only mod.ts
This will fail if there are any dependencies in the dependency tree for mod.ts which are not yet cached.
Integrity Checking and Lock Files Jump to heading
Imagine your module relies on a remote module located at
https://some.url/a.ts. When you compile your module for the first time, a.ts
is fetched, compiled, and cached. This cached version will be used until you
either run your module on a different machine (such as in a production
environment) or manually reload the cache (using a command like
deno install --reload).
But what if the content at https://some.url/a.ts changes? This could result in
your production module running with different dependency code than your local
module. To detect this, Deno uses integrity checking and lock files.
Deno uses a deno.lock file to check external module integrity. To opt into a
lock file, either:
-
Create a
deno.jsonfile in the current or an ancestor directory, which will automatically create an additive lockfile atdeno.lock.Note that this can be disabled by specifying the following in your deno.json:
deno.json{ "lock": false } -
Use the
--lockflag to enable and specify lock file checking.
Frozen lockfile Jump to heading
By default, Deno uses an additive lockfile, where new dependencies are added to the lockfile instead of erroring.
This might not be desired in certain scenarios (ex. CI pipelines or production
environments) where you'd rather have Deno error when it encounters a dependency
it's never seen before. To enable this, you can specify the --frozen flag or
set the following in a deno.json file:
{
  "lock": {
    "frozen": true
  }
}
When running a deno command with a frozen lockfile, any attempts to update the lockfile with new contents will cause the command to exit with an error showing the modifications that would have been made.
If you wish to update the lockfile, specify --frozen=false on the command line
to temporarily disable the frozen lockfile.
Changing lockfile path Jump to heading
The lockfile path can be configured by specifying --lock=deps.lock or the
following in a Deno configuration file:
{
  "lock": {
    "path": "deps.lock"
  }
}
Supply chain management Jump to heading
Modern JavaScript projects pull code from many sources (JSR, npm, HTTPS URLs, local workspaces). Good supply chain management helps you achieve four goals:
- Determinism: everyone (and your CI) runs the exact same code.
- Security: unexpected upstream changes or compromises are detected early.
- Velocity: you can update dependencies intentionally when you choose.
- Resilience: builds keep working offline or when registries have outages.
Core practices Jump to heading
- Pin versions deliberately
- For applications, prefer exact versions (for example
jsr:@luca/cases@1.2.3). - For libraries, a caret range (
^1.2.3) lets consumers get backwards‑compatible fixes. - Avoid unbounded (
*) or overly broad ranges in production applications.
- For applications, prefer exact versions (for example
- Commit your
deno.lockfile. - Enable a frozen lockfile in CI / production (
--frozenor"lock": { "frozen": true }) so new, unseen dependencies fail the build instead of silently appearing. - Vendor when you need hermetic/offline builds (
"vendor": true) or when you must patch third‑party code locally. Vendoring does not remove the need for a lockfile—it complements it. - Prefer import map (
imports) entries over raw HTTPS imports in larger codebases to centralize version changes. - Periodically unfreeze and update consciously (for example on a weekly or sprint cadence) instead of ad‑hoc updates during feature work.
Typical CI pattern Jump to heading
# Install (resolve) dependencies exactly as locked; fail if drift or new deps
deno install --frozen --entrypoint main.ts

# (optional) Run with only cached modules to guarantee no network access
deno run --cached-only main.ts
If you rely on npm packages (package.json present), include deno install
in CI before running tests so the node_modules directory is materialized
deterministically.
Updating dependencies intentionally Jump to heading
When you decide to update:
- Temporarily allow lockfile writes: add
--frozen=falseor set"lock": { "frozen": false }. - Change versions (edit
deno.json, usedeno add <specifier>@<newVersion>, or remove withdeno remove). - Re-run
deno install --entrypoint main.ts(optionally--reload) to update resolutions and integrity hashes. - Review the diff in
deno.lock(andvendor/if used) in your pull request. - Re-enable the frozen lockfile.
Troubleshooting a frozen lockfile Jump to heading
You may encounter errors like:
error: The lockfile is frozen. Cannot add new entry for "jsr:@scope/pkg@1.3.0".
or:
error: Module not found in frozen lockfile: https://example.com/dependency/mod.ts
Common causes and fixes:
| Symptom | Cause | Fix |
|---|---|---|
| Need to bump a version but command fails with frozen error | Lockfile is in frozen mode | Re-run with --frozen=false (one-off) or temporarily set "lock": { "frozen": false }, then update and re-freeze |
| New transitive dependency appears after editing code | Code now imports something not in lockfile | Unfreeze (--frozen=false) and run deno install --entrypoint <entry>.ts to record it |
| Removed imports but lockfile still contains old entries | Lockfile is additive; entries persist | (Optional) regenerate: move deno.lock aside (mv deno.lock deno.lock.old), run install to recreate, compare, then commit |
| Lockfile corruption / merge conflict | Manual edit or conflict left inconsistent JSON | Delete conflicting sections and re-run install, or regenerate entirely |
| Using vendored deps but lockfile complains | Vendor dir out of sync with lockfile | Re-run deno install --entrypoint <entry> (unfrozen) to sync both, then commit |
Safe regeneration checklist Jump to heading
Only regenerate the entire deno.lock when necessary (corruption, massive
pruning). When you do:
- Back it up:
cp deno.lock deno.lock.bak. - Remove it:
rm deno.lock. - (If vendoring) remove or move the
vendor/directory. - Run
deno install --entrypoint main.tsto recreate. - Inspect the diff between old and new to catch unexpected additions.
Vendor vs lockfile Jump to heading
These are complementary:
- Lockfile: records exact resolved versions + integrity hashes for remote and npm/JSR deps.
- Vendor directory: stores the actual source locally for hermetic, offline, and patchable builds.
Use both for maximum reproducibility. A frozen lockfile alone does not make your build fully hermetic if the remote source disappears; vendoring closes that gap.
Quick decision guide Jump to heading
| Need | Use |
|---|---|
| Detect upstream tampering | Lockfile (commit & freeze) |
| Offline / air-gapped build | vendor: true + lockfile |
| Patch third-party code | Vendoring or scopes overrides (short-term) |
| Fast CI with integrity | deno install --frozen |
| Intentionally upgrade | Temporarily unfreeze, run install, review diff |
Minimum supply chain baseline (recommended) Jump to heading
{
  "imports": {/* centralize versions */},
  "vendor": true,
  "lock": { "frozen": true }
}
Commit deno.json, deno.lock, and (if using vendor) the entire vendor/
directory.
Private repositories Jump to heading
There may be instances where you want to load a remote module that is located in a private repository, like a private repository on GitHub.
Deno supports sending bearer tokens when requesting a remote module. Bearer tokens are the predominant type of access token used with OAuth 2.0, and are broadly supported by hosting services (e.g., GitHub, GitLab, Bitbucket, Cloudsmith, etc.).
DENO_AUTH_TOKENS Jump to heading
The Deno CLI will look for an environment variable named DENO_AUTH_TOKENS to
determine what authentication tokens it should consider using when requesting
remote modules. The value of the environment variable is in the format of n
number of tokens delimited by a semi-colon (;) where each token is either:
- a bearer token in the format of
{token}@{hostname[:port]}or - basic auth data in the format of
{username}:{password}@{hostname[:port]}
For example, a single token for deno.land would look something like this:
DENO_AUTH_TOKENS=a1b2c3d4e5f6@deno.land
or:
DENO_AUTH_TOKENS=username:password@deno.land
And multiple tokens would look like this:
DENO_AUTH_TOKENS=a1b2c3d4e5f6@deno.land;f1e2d3c4b5a6@example.com:8080;username:password@deno.land
When Deno goes to fetch a remote module, where the hostname matches the hostname
of the remote module, Deno will set the Authorization header of the request to
the value of Bearer {token} or Basic {base64EncodedData}. This allows the
remote server to recognize that the request is an authorized request tied to a
specific authenticated user, and provide access to the appropriate resources and
modules on the server.
GitHub Jump to heading
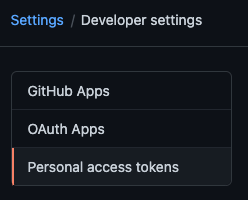
To access private repositories on GitHub, you would need to issue yourself a personal access token. You do this by logging into GitHub and going under Settings -> Developer settings -> Personal access tokens:
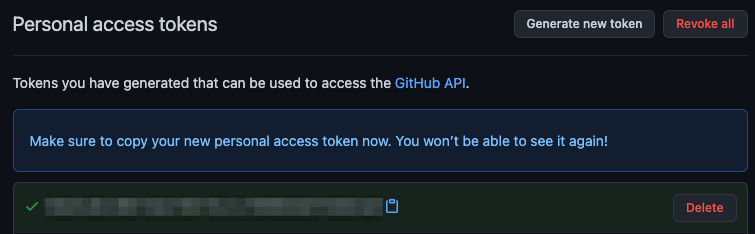
You would then choose to Generate new token and give your token a description
and appropriate access to the repo scope. The repo scope will enable reading
file contents (more on
scopes in the GitHub docs):

And once created GitHub will display the new token a single time, the value of which you would want to use in the environment variable:
In order to access modules that are contained in a private repository on GitHub,
you would want to use the generated token in the DENO_AUTH_TOKENS environment
variable scoped to the raw.githubusercontent.com hostname. For example:
DENO_AUTH_TOKENS=a1b2c3d4e5f6@raw.githubusercontent.com
This should allow Deno to access any modules that the user who the token was issued for has access to.
When the token is incorrect, or the user does not have access to the module,
GitHub will issue a 404 Not Found status, instead of an unauthorized status.
So if you are getting errors that the modules you are trying to access are not
found on the command line, check the environment variable settings and the
personal access token settings.
In addition, deno run -L debug should print out a debug message about the
number of tokens that are parsed out of the environment variable. It will print
an error message if it feels any of the tokens are malformed. It won't print any
details about the tokens for security purposes.