On this page
Connect to Prisma Postgres
You are viewing legacy documentation for Deno Deploy Classic. We recommend migrating to the new Deno Deploy platform.
This tutorial covers how to connect to a Prisma Postgres database from an application deployed on Deno Deploy.
Setup Postgres Jump to heading
There are several ways to set up a Prisma Postgre database for your Prisma project. This guide covers the most common approaches.
Method 1: Using Prisma CLI Jump to heading
Run the following command to initialize a new Prisma project with a database:
npx prisma init --db
This will prompt you to select your preferred region and database name. Once
completed, you'll find the DATABASE_URL connection string in your .env file.
Method 2: Using npx create-db Jump to heading
Alternatively, you can use the dedicated database creation tool:
npx create-db@latest
This command will provide you with two connection strings tied to the same database:
Prisma ORM optimized connection string:
prisma+postgres://accelerate.prisma-data.net/?api_key=<api_key>
Standard Prisma Postgres connection string:
postgresql://<username>:<password>@db.prisma.io:5432/postgres
In order to keep the database created with npx create-db, you must follow
through with the claim process. That can be done via the claim link provided in
the terminal.
The Prisma ORM optimized connection string (prisma+postgres://) only works
with the Prisma ORM, while the standard Prisma Postgre connection string can be
used with other database tools and libraries.
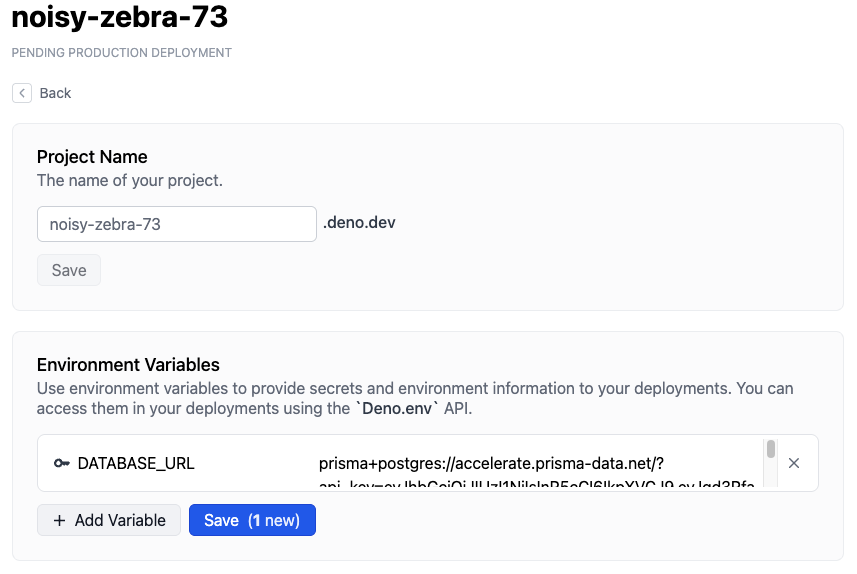
Create a project in Deno Deploy Jump to heading
Next, let's create a project in Deno Deploy Classic and set it up with the requisite environment variables:
- Go to https://dash.deno.com/new (Sign in with GitHub if you didn't already) and click on Create an empty project under Deploy your own code.
- Now click on the Settings button available on the project page.
- Navigate to Environment Variables Section and add the following secret.
DATABASE_URL- The value should be set to the connection string you saved in the last step.
Write code that connects to Postgres Jump to heading
Now that you have your database set up, let's create a simple application that connects to the Prisma Postgres database using Prisma ORM.
1. Install dependencies Jump to heading
First, install the required dependencies:
deno install npm:@prisma/client
deno install npm:@prisma/extension-accelerate
deno install npm:dotenv-cli
The dotenv-cli package is needed because Prisma Client doesn't read .env
files by default on Deno.
2. Create the database schema Jump to heading
With your database connection configured, you can now apply the data model to your database:
deno run -A npm:prisma migrate dev --name init
This command creates a new SQL migration file and runs it against your database.
3. Update your Prisma schema Jump to heading
Edit your prisma/schema.prisma file to define a Log model and configure it
for Deno:
generator client {
  provider = "prisma-client"
  output   = "../generated/prisma"
  runtime  = "deno"
}

datasource db {
  provider = "postgresql"
  url      = env("DATABASE_URL")
}

model Log {
  id      Int    @id @default(autoincrement())
  level   Level
  message String
  meta    Json
}

enum Level {
  Info
  Warn
  Error
}
4. Create your application Jump to heading
Create index.ts in your project root with the following content:
import { serve } from "https://deno.land/std@0.140.0/http/server.ts";
import { withAccelerate } from "npm:@prisma/extension-accelerate";
import { PrismaClient } from "./generated/prisma/client.ts";

const prisma = new PrismaClient().$extends(withAccelerate());

async function handler(request: Request) {
  // Ignore /favicon.ico requests:
  const url = new URL(request.url);
  if (url.pathname === "/favicon.ico") {
    return new Response(null, { status: 204 });
  }

  const log = await prisma.log.create({
    data: {
      level: "Info",
      message: `${request.method} ${request.url}`,
      meta: {
        headers: JSON.stringify(request.headers),
      },
    },
  });
  const body = JSON.stringify(log, null, 2);
  return new Response(body, {
    headers: { "content-type": "application/json; charset=utf-8" },
  });
}

serve(handler);
4. Test your application locally Jump to heading
Start your application locally to test the database connection:
npx dotenv -- deno run -A ./index.ts
Visit http://localhost:8000 in your browser. Each request will create a new
log entry in your database and return the log data as JSON.
Deploy application to Deno Deploy Classic Jump to heading
Once you have finished writing your application, you can deploy it on Deno Deploy Classic.
To do this, go back to your project page at
https://dash.deno.com/projects/<project-name>.
You should see a couple of options to deploy:
- Github integration
deployctldeployctl deploy --project=<project-name> <application-file-name>
Unless you want to add a build step, we recommend that you select the GitHub integration.
For more details on the different ways to deploy on Deno Deploy Classic and the different configuration options, read here.